Project_14_ESP32_WiFi_BLE_Coexistence.ino, then open it in the Arduino IDE (setup: Foundation 3). Needs the DHT, Adafruit Unified Sensor, ESP Async WebServer + AsyncTCP libraries and your Wi-Fi credentials. BLE ships with the core.
diagram.json above and paste its wiring in to load the circuit. Wokwi can wire up the DHT11 and LED, but testing the BLE side still needs a real board and a phone.
🎯 Objective
By the end of this project, you will:
- Explain why Wi-Fi and Bluetooth share one radio on the ESP32, and what "coexistence" means in practice.
- Run a BLE GATT server (
BLEDevice) alongside an async Wi-Fi web server in the same sketch. - Publish one sensor reading to two different kinds of client at once, from a single cached value read on a timer.
- Accept input from two different technologies, a web toggle and a BLE write, and keep one LED's state true for both.
- Read a BLE characteristic in a phone app and watch it update as fast as the sensor itself does.
- Compare this with Project 8's button/web sync: the same idea, with a wireless source standing in for the physical button.
1One chip, one radio, two protocols
Foundation 2 mentions that the ESP32 has Wi-Fi (2.4 GHz) and Bluetooth (Classic + BLE) on the same chip. What it doesn't say is how they share the hardware: there is only one 2.4 GHz radio. Wi-Fi and Bluetooth take turns on it in tiny slices of time, a scheme Espressif calls coexistence, handled for you by the driver underneath WiFi.h and BLEDevice.h. You don't schedule the handoff yourself; you just avoid hammering both stacks at once and let the coexistence logic interleave them.
2Install the required libraries
Nothing new beyond what Project 9 already needs:
- DHT sensor library (Adafruit)
- Adafruit Unified Sensor (dependency)
- ESP Async WebServer
- AsyncTCP (ESP32)
BLEDevice.h and friends ship with the esp32 by Espressif Systems board package itself, the same way WiFi.h and Wire.h do.3Parts & wiring
| Qty | Part | Notes |
|---|---|---|
| 1 | ESP32 · breadboard · jumper wires | - |
| 1 | DHT11 module | 3‑pin: −, +, S |
| 1 | LED | Any colour |
| 1 | 220 Ω resistor | Current-limits the LED |
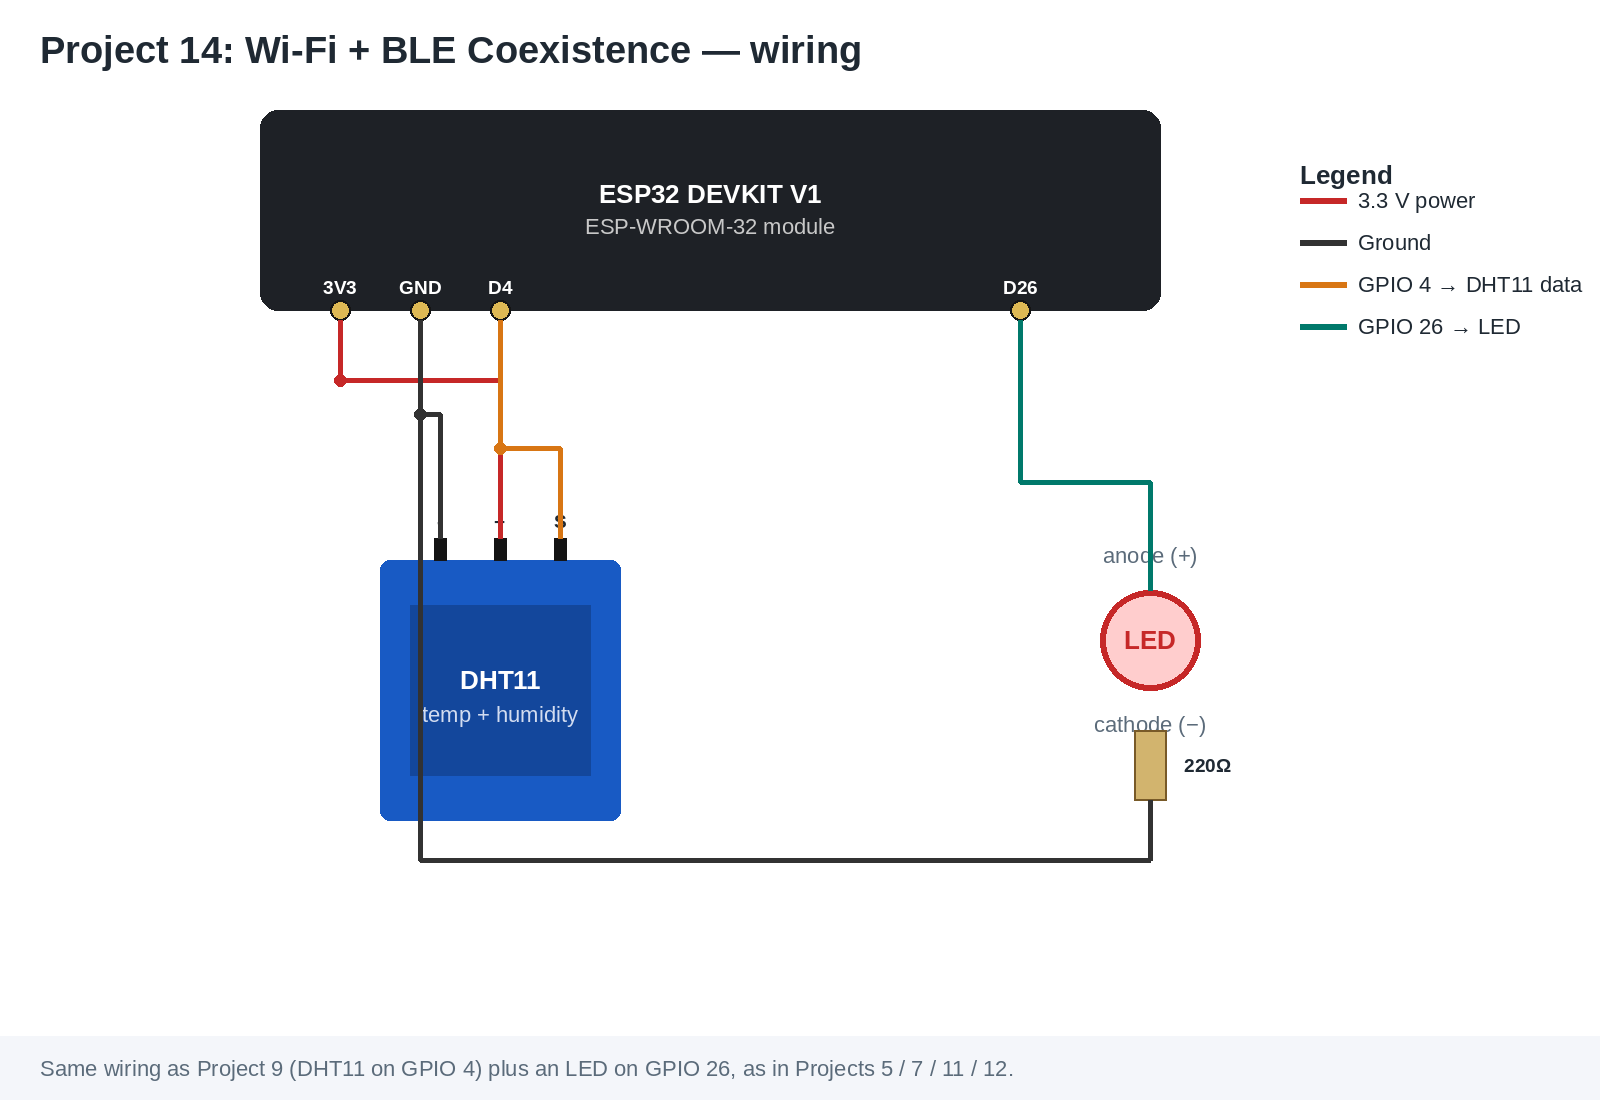
- DHT11 S → GPIO 4, + → 3.3 V, − → GND (exactly Project 9's wiring)
- LED anode → 220 Ω resistor → GPIO 26, cathode → GND (exactly Project 5's wiring)
4Upload & use
- Set your Wi-Fi
ssid/passwordinProject_14_ESP32_WiFi_BLE_Coexistence.ino. - Upload, open Serial Monitor at 115200, press EN/RESET:
==============================================
 Project 14: ESP32 Wi-Fi + Bluetooth Coexistence
==============================================
DHT11 data -> GPIO 4
LED        -> GPIO 26
Connecting to Wi-Fi: MyNetwork
....
Wi-Fi connected!
Open this address in your browser:  http://192.168.1.42
----------------------------------------------
BLE advertising as: ESP32-Kit-P14
Scan for it in a BLE app (e.g. nRF Connect) while the Wi-Fi page stays open.
----------------------------------------------
[SENSOR] Temp: 24.6 C  Hum: 58.0 %
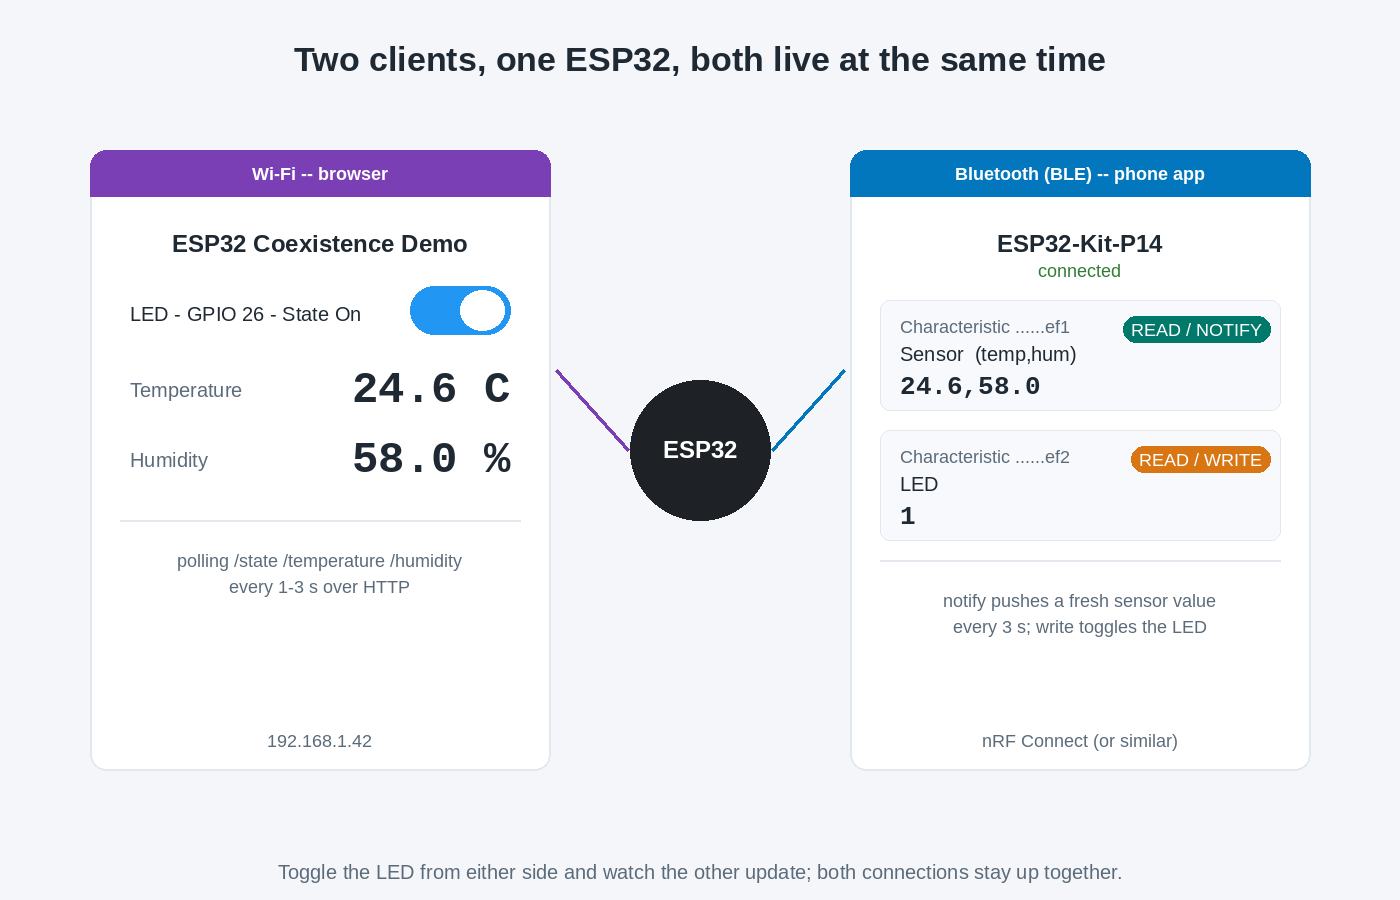
- Open the printed address in a browser: the page shows the LED switch and live temperature and humidity.
- On your phone, install a free BLE scanner app: nRF Connect for Mobile (by Nordic Semiconductor) is available for both iOS (App Store) and Android (Google Play) and works identically for this project on either. Open it, scan, and connect to
ESP32-Kit-P14. Open its one service and you'll find two characteristics: a sensor characteristic you can subscribe to for live notifications, and an LED characteristic you can read and write. - Toggle the LED from the web page and watch the BLE characteristic's value change on the next read. Write
1or0to the LED characteristic from the app and watch the web page's switch flip on its own, no click involved. Both channels are live at once.
5Code Walkthrough: Understanding the Sketch
Project_14_ESP32_WiFi_BLE_Coexistence.ino adds a BLE server next to the async web server pattern from Projects 7 to 9. Here is what is new.
Step 1: Bringing up Wi-Fi, then BLE, in the same setup()
WiFi.begin(ssid, password);
while (WiFi.status() != WL_CONNECTED) { delay(500); Serial.print("."); }
...
BLEDevice::init(BLE_DEVICE_NAME);
BLEServer *bleServer = BLEDevice::createServer();
There's nothing special about the order: Wi-Fi connects first because that loop is already familiar from Project 5 onward, and BLE initializes right after. Once both are up, they run concurrently for the rest of the sketch. Nothing here picks one radio over the other.
Step 2: One cached reading, read on a timer
const unsigned long SENSOR_INTERVAL = 3000;
unsigned long lastSensorRead = 0;

void loop(){
  if (millis() - lastSensorRead >= SENSOR_INTERVAL) {
    lastSensorRead = millis();
    float t = dht.readTemperature();
    float h = dht.readHumidity();
    ...
    lastTempStr = String(t, 1);
    lastHumStr  = String(h, 1);
  }
}
This is Project 4's non-blocking millis() timer again. The important design choice: the DHT11 is read once, here, on a schedule, never inside a request handler. Both the web endpoints and the BLE characteristic read from lastTempStr / lastHumStr afterward. If a browser and a BLE app both asked the sensor directly, two clients could double-poll a sensor that only manages about one reading per second.
Step 3: Publishing the same reading two ways
server.on("/temperature", HTTP_GET, [](AsyncWebServerRequest *request){
  request->send_P(200, "text/plain", lastTempStr.c_str());
});
String payload = lastTempStr + "," + lastHumStr;
sensorChar->setValue(payload.c_str());
if (bleClientConnected) sensorChar->notify();
The web side is Project 9's polling pattern, unchanged. The BLE side is new: setValue() updates what a client will read, and notify() pushes that value to any subscribed client immediately, without the client having to ask. That's what the BLE2902 descriptor added to the characteristic in setup() is for, it's the standard switch a BLE client flips to say "notify me":
sensorChar = service->createCharacteristic(
  SENSOR_CHAR_UUID,
  BLECharacteristic::PROPERTY_READ | BLECharacteristic::PROPERTY_NOTIFY
);
sensorChar->addDescriptor(new BLE2902());
Step 4: One LED, two ways in
void setLed(bool on, const char* source){
  ledState = on;
  digitalWrite(LED_PIN, ledState ? HIGH : LOW);
  ledChar->setValue(ledState ? "1" : "0");
  Serial.printf("[%s]    LED -> %s\n", source, ledState ? "ON" : "OFF");
}
Both the web /update handler and the BLE write callback end up calling this one function. That's Project 8's lesson again: whichever side changes the state, the change has to update every place that state is stored, here ledState, the physical pin, and the BLE characteristic's own cached value, or one side goes stale.
class LedCallbacks: public BLECharacteristicCallbacks {
  void onWrite(BLECharacteristic *characteristic) override {
    String value = characteristic->getValue().c_str();
    if (value.length() > 0) setLed(value[0] == '1', "BLE");
  }
};
onWrite() is BLE's version of an async route handler: the library calls it whenever a connected client writes to that characteristic. Compare it with the /update route in the sketch, doing the same job for the web side.
The web page's /state endpoint is what makes the change visible without a manual refresh: exactly Project 8's setInterval polling a /state endpoint once a second, so a BLE-originated toggle shows up on an already-open browser tab on its own.
Step 5: Serial tags show which side did what
[WEB]    LED -> ON
[BLE]    LED -> OFF
[SENSOR] Temp: 24.6 C  Hum: 58.0 %
Every log line is tagged with its source, [WEB], [BLE], or [SENSOR], the same event-based logging style as Project 8's [WEB] / [BUTTON] tags. Watching the Serial Monitor while you toggle from both sides is the clearest proof that both channels are live: you'll see both tags appear, interleaved, with nothing blocking either one.
Key concepts: what each line really does
| Code | What it does |
|---|---|
BLEDevice::init(name) | Starts the BLE stack and sets the name a scanner will show. |
createService(uuid) / createCharacteristic(uuid, props) | Defines the BLE equivalent of a web route: a UUID clients read, write, or subscribe to. |
PROPERTY_READ | PROPERTY_NOTIFY | This characteristic can be read on demand and can push updates. |
PROPERTY_READ | PROPERTY_WRITE | This characteristic can be read and can be written by a client. |
new BLE2902() | The standard descriptor a client uses to subscribe to notifications. |
characteristic->setValue(...) | Updates what the next read (or notify) will return. |
characteristic->notify() | Pushes the current value to subscribed clients immediately. |
BLECharacteristicCallbacks::onWrite() | Runs when a client writes to the characteristic, BLE's version of a route handler. |
BLEServerCallbacks::onConnect() / onDisconnect() | Track whether a BLE client is present, and resume advertising after it leaves. |
setLed(on, source) | One function both input paths call, so the pin, the state variable, and the BLE value never disagree. |
6Demonstration
7Knowledge Check
Test your understanding.
1. Why can the ESP32 run Wi-Fi and Bluetooth at the same time despite having only one radio?
2. Why does the sketch read the DHT11 in `loop()` on a timer, instead of inside the `/temperature` route handler?
3. What does calling `notify()` on a BLE characteristic do?
4. When the BLE app writes a new LED state, how does the web page's toggle switch update without the user refreshing?
5. What does `setLed()` update on every call?
8Wrapping Up: What You've Learned
This project doesn't introduce a new sensor or a new actuator: it reruns Project 9's DHT11 and Project 5's LED over a second, independent wireless channel, to prove the ESP32 can genuinely do both at once.
- The ESP32 has one radio, two protocols, kept apart by a coexistence scheduler you don't have to manage yourself, as long as neither side floods it.
- A cached, timer-read value is what lets two different kinds of client share one sensor without either one hammering it. The same idea would apply to three clients, or ten.
- State has to be kept honest across every place it's stored (Project 8), and that gets harder, not easier, as you add channels: this sketch updates a variable, a GPIO pin, and a BLE characteristic from one function so none of the three can drift from the others.
- BLE's characteristics are the rough equivalent of a web server's routes: a UUID to read, write, or subscribe to, instead of a URL to
GETorPOST. - Polling (the web page) and push (BLE
notify()) are two different ways to keep a client fresh. This project uses both side by side, so you can feel the difference: notify is instant, polling has to wait for its next tick.
Now try
- Three-way sync: Add Project 8's physical pushbutton back in, on a free GPIO. Now the LED has three inputs, a button, a web toggle, and a BLE write, all kept honest by the same
setLed()pattern. - A threshold alarm: Add a third BLE characteristic that reports
1when the temperature crosses a limit you choose, so a BLE app can alert on it without polling the raw numbers itself.
9Troubleshooting
| Symptom | Likely cause | Fix |
|---|---|---|
| BLE device doesn't appear in the scanner app | Bluetooth off on the phone, or out of range | Enable Bluetooth, stay within a few metres, rescan |
| Web page never shows the BLE-originated LED change | /state polling stopped, or the page was left open too long | Reload the page; check Wi-Fi is still connected |
| Notifications never arrive in the BLE app | Client didn't subscribe (the app needs to enable notifications on that characteristic) | Tap the notify/subscribe icon next to the sensor characteristic in your BLE app |
| Both stacks feel sluggish | Too much traffic on one radio at once (e.g. a firmware upload plus heavy polling) | This project's cadence (a few seconds per read) is intentionally light; avoid tightening the intervals further |
| Compile error (BLE headers) | Old ESP32 core version | Update the esp32 by Espressif Systems board package to 3.0.7 or newer |
Reads -- for temperature/humidity | DHT11 signal not on GPIO 4, or bad wiring | Check S → GPIO 4, + → 3.3 V, − → GND |