Project_9_ESP32_DHT11_Web_Server.ino, then open it in the Arduino IDE (setup: Foundation 3). Needs the DHT, Adafruit Unified Sensor, ESP Async WebServer + AsyncTCP libraries and your Wi-Fi credentials.
diagram.json above and paste its wiring in to load the circuit.
🎯 Objective
By the end of this project, you will:
- Read a real environmental sensor and get physical units out of it, not raw counts.
- Use a sensor library and understand what it does for you underneath.
- Handle a failed reading with
isnan()instead of publishing a nonsense number. - Fill placeholders in a page with live values using a template processor.
- Update parts of a page in the background, so figures refresh without a reload.
- Compare this with Project 2's ADC: a digital sensor speaks numbers, an analog one gives a voltage you must interpret.
1The DHT11 sensor & auto‑updating pages
The DHT11 is a small, slow, cheap sensor that reports temperature (°C) and relative humidity (%) over one data wire. Read it every couple of seconds: no faster.
To refresh without reloading, the browser polls (like Project 8): two timers fetch /temperature and /humidity every 10 s and drop the numbers into the page:
setInterval(function () {
  xhttp.open("GET", "/temperature", true);   // fetch just the number
  ...
}, 10000);                                     // every 10 seconds
2Install the required libraries
- DHT sensor library (Adafruit)
- Adafruit Unified Sensor (dependency)
- ESP Async WebServer
- AsyncTCP (ESP32)
The first two are in the Library Manager; the async pair install as ZIPs (as in Projects 7–8).
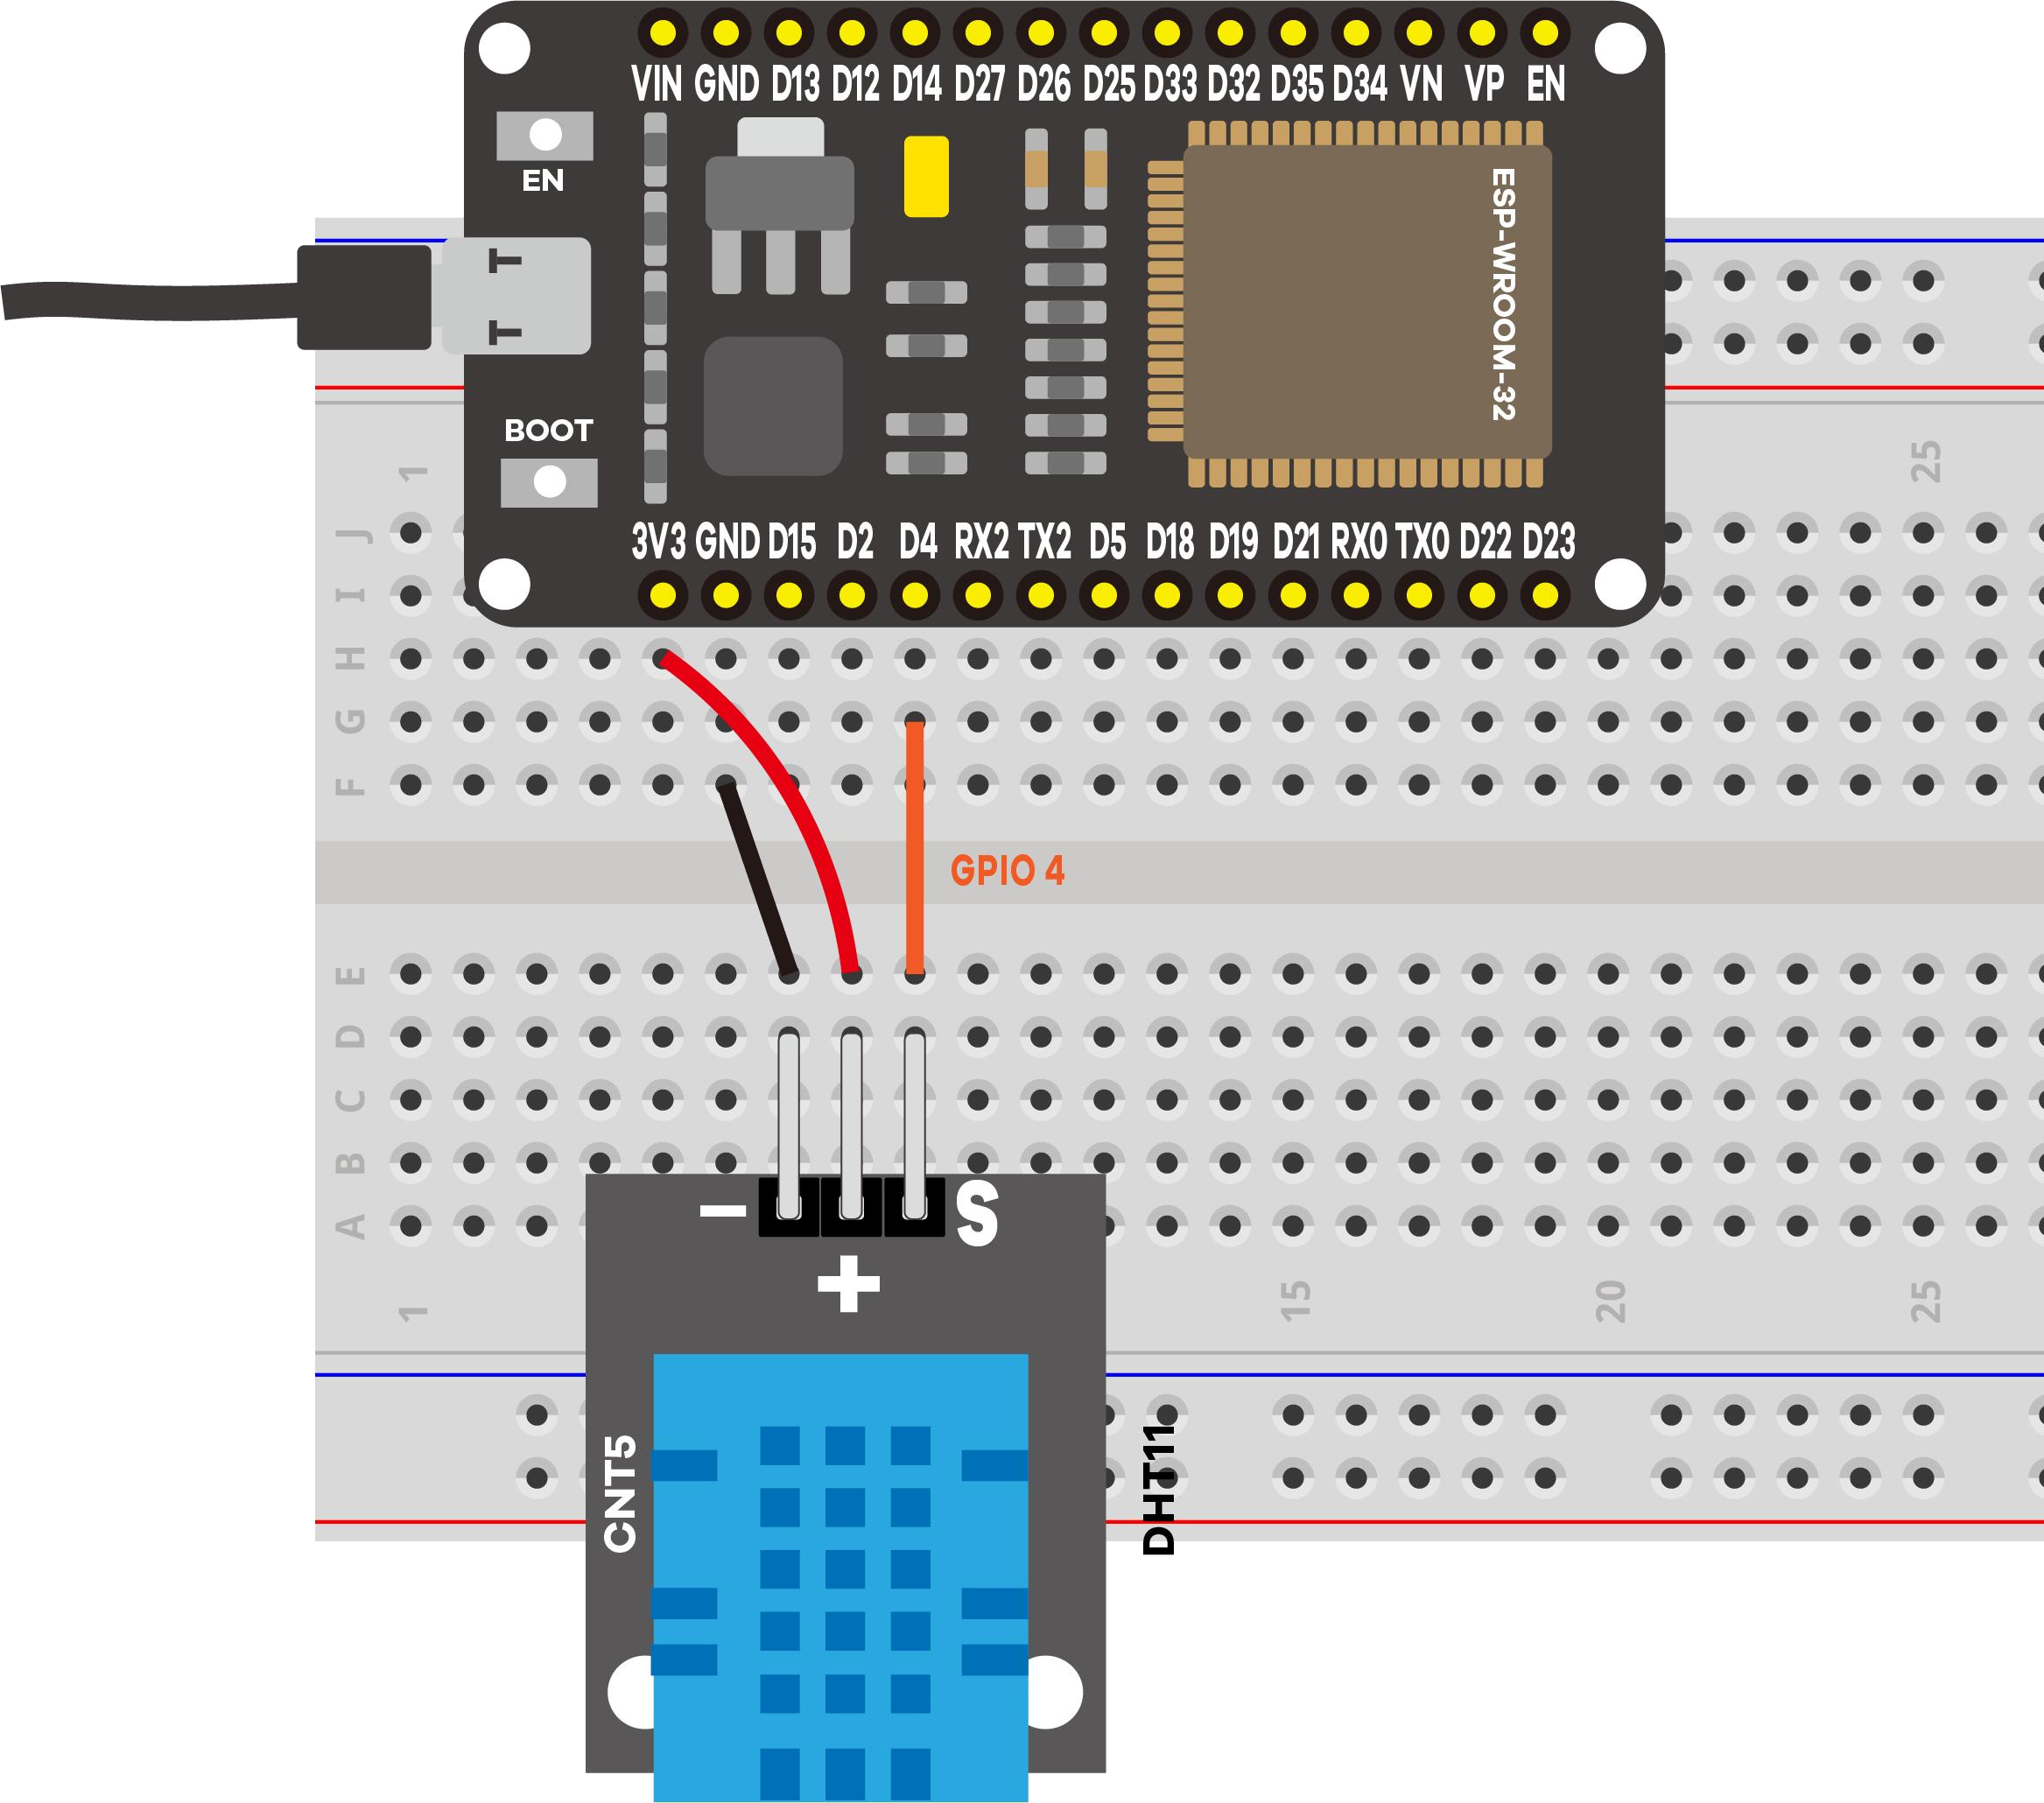
3Parts & wiring
| Qty | Part | Notes |
|---|---|---|
| 1 | ESP32 · breadboard · jumper wires | - |
| 1 | DHT11 module | 3‑pin: −, +, S |
4Upload & use
Set your Wi‑Fi credentials, upload, open Serial Monitor at 115200, press EN/RESET:
==============================================
 Project 9: ESP32 DHT11 Web Server
==============================================
DHT11 data -> GPIO 4
Connecting to Wi-Fi: MyNetwork
....
Wi-Fi connected!
Open this address in your browser:  http://192.168.1.42
----------------------------------------------
[DHT] Temperature: 21.4 C
[DHT] Humidity: 63.9 %
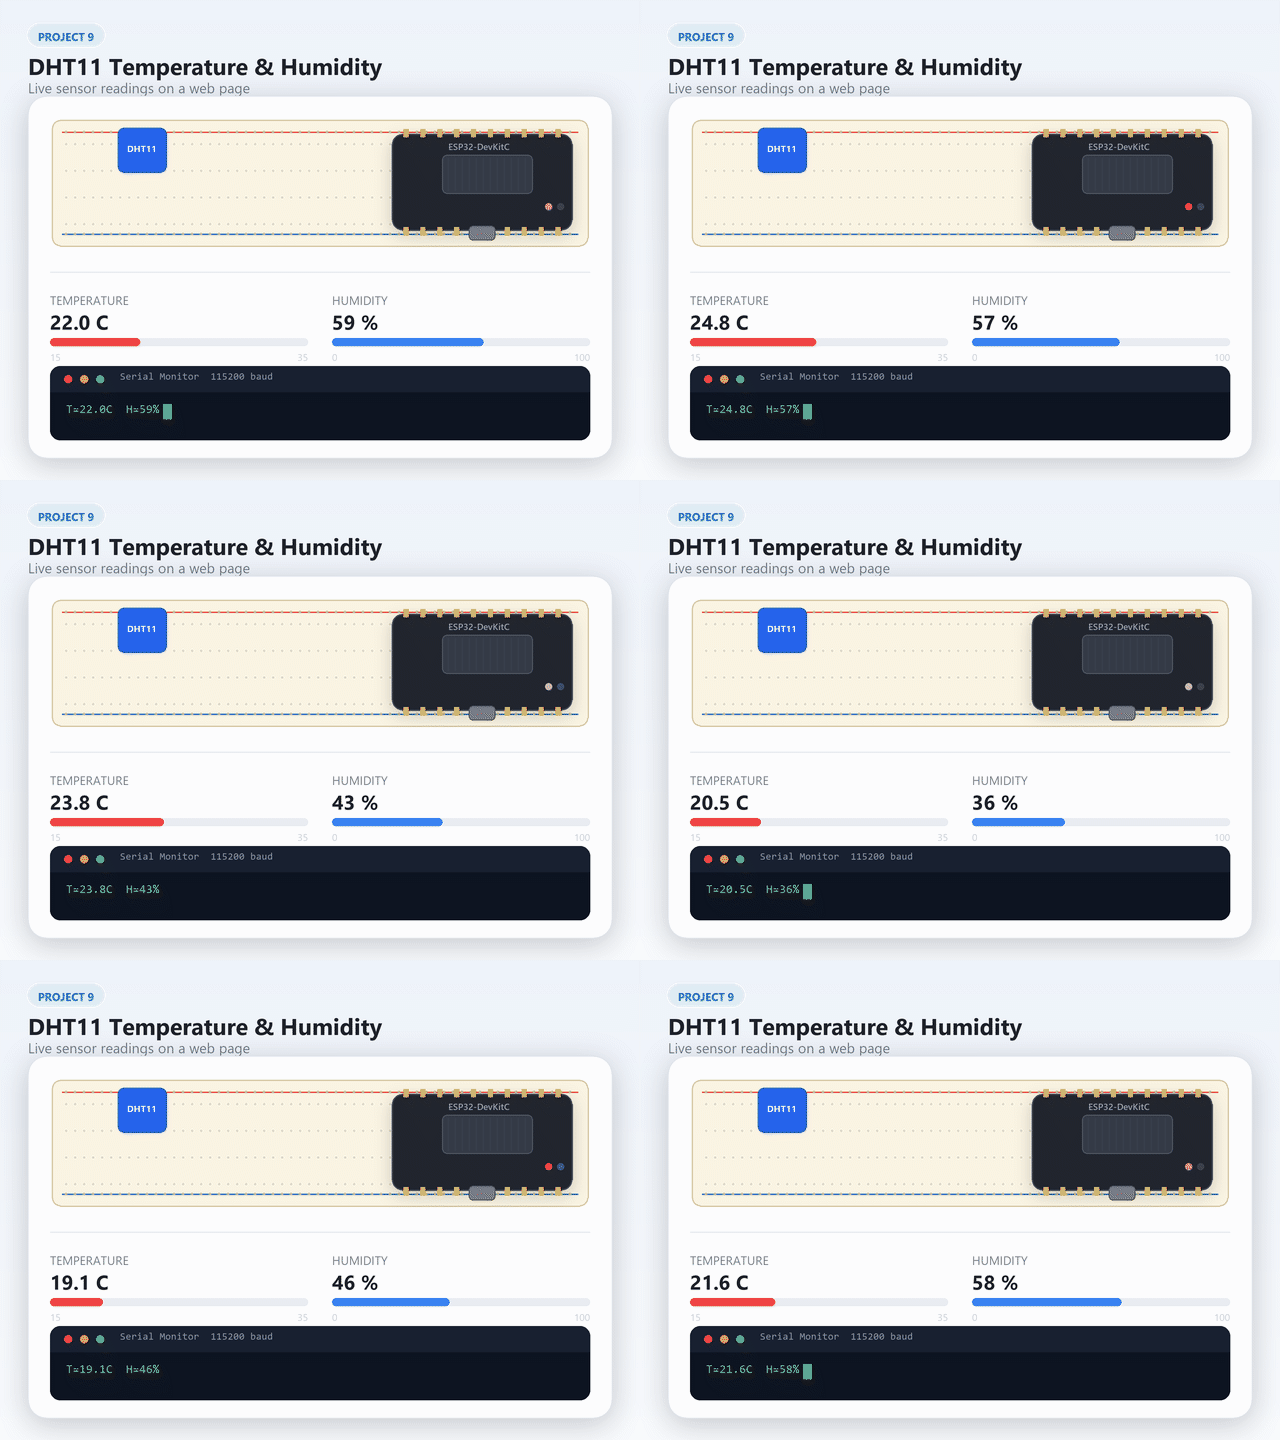
The logging prints labeled readings with units, so you can confirm the sensor works before opening the page.
5Code Walkthrough: Understanding the Sketch
The async server again, with a sensor behind it. Here is what is new.
Step 1: Telling the library which sensor, on which pin
#include <Adafruit_Sensor.h>
#include <DHT.h>

#define DHTPIN 4          // data pin
#define DHTTYPE DHT11     // the family member we have

DHT dht(DHTPIN, DHTTYPE);
DHT dht(DHTPIN, DHTTYPE) creates an object: a bundle of the pin number, the sensor type, and the code that talks to it. From here on you ask dht for readings rather than handling the pin yourself.
dht.readTemperature() hides all of it.Step 2: Reading safely, with a fallback
String readDHTTemperature() {
  float t = dht.readTemperature();       // Celsius by default
  if (isnan(t)) {
    Serial.println("[DHT] Failed to read temperature!");
    return "--";                         // show a dash, not a wrong number
  }
  return String(t);
}
isnan() asks "is this Not a Number?" A DHT11 read fails now and then, from a loose wire or from being asked too often, and the library reports that by returning NaN. Checking for it is what keeps -- on the page instead of a meaningless value.
Both readers return String rather than float, because their output goes straight into a web page. dht.readTemperature(true) returns Fahrenheit.
Step 3: Placeholders in the page, filled at send time
<span id="temperature">%TEMPERATURE%</span>
<span id="humidity">%HUMIDITY%</span>
String processor(const String& var){
  if (var == "TEMPERATURE") return readDHTTemperature();
  else if (var == "HUMIDITY")  return readDHTHumidity();
  return String();
}
Same mechanism as Project 7, used for data instead of controls. The first page you load therefore already shows real values, with no wait.
Step 4: Two endpoints, and a page that refreshes itself
server.on("/temperature", HTTP_GET, [](AsyncWebServerRequest *request){
  request->send_P(200, "text/plain", readDHTTemperature().c_str());
});
setInterval(function () {
  ...
  document.getElementById("temperature").innerHTML = this.responseText;
  xhttp.open("GET", "/temperature", true);
}, 10000);
Exactly Project 8's polling pattern, with two differences: each value has its own endpoint returning plain text, and the interval is 10 seconds rather than 1. The DHT11 produces a fresh sample only about once a second and is not a fast-moving quantity, so polling harder would gain nothing. innerHTML replaces just the contents of one <span>, which is why the figures change while the rest of the page sits still.
This pattern, a script fetching data in the background and updating part of the page, is what people usually mean by AJAX (Asynchronous JavaScript and XML, even though nothing here is XML). It's the opposite of Project 5's approach: there, clicking a button loaded an entirely new page (a full page reload, complete with a network round-trip and a visible flash), because the button was a plain link to a new URL. Here, only the two <span> contents change, and the rest of the page, its layout, styles, and icons, never re-downloads. The tradeoff is complexity: Project 5's link needs no JavaScript at all, while this page needs setInterval and XMLHttpRequest to pull off a partial update.
Step 5: an empty loop() again
Readings are taken on demand, when a browser asks. If you wanted logging every minute regardless of visitors, that is where a millis() timer from Project 4 would go.
Key concepts: what each line really does
| Code | What it does |
|---|---|
DHT dht(DHTPIN, DHTTYPE) | Creates the sensor object holding the pin, the type, and the protocol code. |
dht.begin() | Prepares the pin and the library. Like Serial.begin(), it belongs in setup(). |
dht.readTemperature() | Returns degrees Celsius as a float, already converted. Pass true for Fahrenheit. |
dht.readHumidity() | Returns relative humidity in percent. |
isnan(t) | Detects a failed reading. The library returns NaN on error, and NaN equals nothing, so it needs its own test. |
String(t) | Turns the number into text for the web page. |
%TEMPERATURE% + processor() | Placeholder and the function that fills it, so the first page load already carries real values. |
send_P(200, "text/plain", ...) | Replies with a bare number, no HTML: all the JavaScript needs. |
innerHTML = this.responseText | Swaps the text inside one element, leaving the rest of the page untouched. |
setInterval(..., 10000) | Ten seconds between polls, matched to how fast a DHT11 can actually produce new data. |
Going further: DHT11 vs. DHT22
| DHT11 (this kit) | DHT22 | |
|---|---|---|
| Temperature range | 0 to 50 °C | −40 to 80 °C |
| Temperature accuracy | ±2 °C | ±0.5 °C |
| Humidity range | 20 to 90 %RH | 0 to 100 %RH |
| Humidity accuracy | ±5 %RH | ±2 %RH |
| Sampling rate | ~1 reading/s | ~1 reading/2 s |
| Price | Cheaper | More expensive |
The code barely changes: swap the commented #define DHTTYPE DHT22 line for the active one, rewire (a DHT22 module uses the same three pins), and everything else in this sketch, from dht.readTemperature() to the web page, works unchanged. The DHT22's wider range and tighter accuracy matter for anything outdoors or near freezing; for a room‑temperature demo like this one, the DHT11 is plenty.
6Demonstration
7Knowledge Check
Test your understanding.
1. What two values does the DHT11 sensor measure?
2. Why should you check `isnan()` before publishing a DHT11 reading?
3. How does the web page update the temperature and humidity without the user refreshing?
4. What happens if you use ADC2 pins while Wi-Fi is active?
8Wrapping Up: What You've Learned
This is the first project that measures the world and publishes it, which is what most IoT devices spend their lives doing.
- A digital sensor hands you finished numbers over a protocol. Contrast Project 2, where the ADC gave a voltage and you did the interpreting.
- Libraries exist because that protocol is fiddly:
dht.readTemperature()replaces microsecond-accurate pulse timing. - Sensors fail sometimes. Always check (
isnan()) and show something honest: a dash beats a wrong number. - Sensors have a sampling rate. The DHT11 manages roughly one reading per second, accurate to about ±2 °C and ±5 % RH, so a 10-second refresh is generous.
- Template placeholders put live values into the first page load; polling keeps them fresh afterwards.
- The page is now a dashboard. Project 11 sends the same readings to a cloud service so you can watch them from outside the building.
Now try
- Temperature warning LED: Wire an LED to GPIO 26 and turn it on when the temperature exceeds a threshold (e.g., 30°C). The web page should also show the warning.
- CSV data logging: Format the Serial output as comma-separated values (timestamp, temperature, humidity) so you can paste it into a spreadsheet for analysis.
9Troubleshooting
| Symptom | Likely cause | Fix |
|---|---|---|
Reads -- / "Failed to read" | Signal not on GPIO 4 / bad wiring | S → GPIO 4, + → 3.3 V, − → GND |
| Compile error (DHT/sensor) | Libraries missing | Install DHT + Adafruit Unified Sensor |
| Compile error (async) | Async libs missing | Install ESP Async WebServer + AsyncTCP |
| Icons missing on page | No internet on the phone | Numbers still work; give the device internet |
| Values never change | DHT11 is slow | Wait ~10 s between updates |